Valley Kayak Skeg Tube Splice Kit
Valley Kayak Skeg Tube Splice Kit
Valley kayaks designed from 2010 on (Etain, Gemini, Sirona) come with a rectangular black plastic skeg control block which is bolted into its recess on the deck outside the cockpit with four stainless steel metric machine screws. The skeg cable and stiffener tube slide in this rectangular block and telescope out of it. This block also holds the control end of the skeg cable's poly tube sheath in place while allowing the skeg cable to slide through it.
Older model Valley Kayaks (Nordkapp, Aquanaut, Skerray, Avocet, Pintail, Anas Acuta) had a different skeg control system and do not use these parts.
The setscrew at the aft end of the rectangular Control Block keeps the skeg cable's poly tube sheath from disconnecting. The end of the poly tube has a brass ring compressed onto it and the setscrew touches the poly tube behind the brass ring. So if you were to pull on the poly tube, the brass ring which is attached to the tube will hit the side of the setscrew and stop the poly tube from coming out. This is what prevents the poly tube from pulling out of the Control Block and disconnecting when the skeg blade is jammed by a rock and you push hard on the control knob to try to free the skeg blade. Unfortunately it is possible for the brass ring to slip off the poly tube. When you take this all apart, if you don't see a brass ring on the end of the poly tube it is probably stuck inside the Control Block. If the ring has slipped off the poly tube, dig the brass ring out of the Control Block with a dental pick, paperclip, etc. otherwise the old ring will prevent you from properly assembling the poly tube into the control block. It does no good to push the brass ring back onto the poly tube - it will just slip off again unless it is assembled with a compression fitting. There are several ways you could fix this, but the cleanest, simplest, quickest, easiest was is with the Valley Skeg Tube Splice Kit,
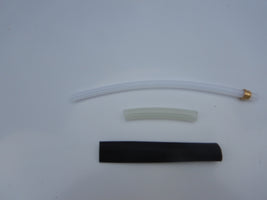
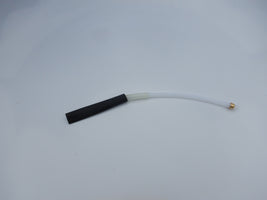
The repair Splice Kit consists of a few inches of poly tube with a brass ring already compressed on it near the front end, a larger diameter "splint tube", and some heat shrink tubing. To make the repair: Unbolt the seat and slide it forward out of your way. Use a 4mm hex (allen) wrench to remove the four mounting bolts on the Control Block and a 2.5mm hex wrench to loosen the setscrews on the knob and the aft end of the Control Block. Dismantle the skeg control unit and pull the skeg blade out of the kayak. Assuming the brass ring has slipped off the poly tube, pull the poly tube though the hole at the aft end of the recess and into the cockpit. Line up the ends of the splice kit's poly tube with the poly tube in the kayak and mark the end of the splice tube on the tube in the kayak. Cut the kayak's poly tube at the point you marked so when the splice is made it will be the original length. Slide the heat shrink tube and splint tube onto the end of the kayak's poly tube. Insert the splice piece poly tube through the aft end of the control system recess with the brass ring toward the bow. Butt the spice piece together with the kayak's poly tube then overlap the splint tube and heat shrink tube half way on either side of the butt splice. Use a heat-gun on low to shrink the heat shrink tubing over the splice and splint tubes. Reassemble the skeg and control system.
When assembling, be sure the clear poly tube that the skeg cable runs through is inserted far enough into the aft end of this control block that the control block's setscrew will miss the brass compression ring on the end of the poly tube and come down on the poly tube behind the brass compression ring. The setscrew and brass ring are what keep the poly tube from backing out of the control block and disconnecting. The setscrew should touch the poly tube but not compress or deform it as that will add friction making it difficult to move the skeg control cable. As soon as you feel a bit of resistance to tightening the setscrew, STOP. Also if you over tighten the set screw at the aft end of this block (say by hitting the brass ring instead of the poly tube) it is easy to strip the threads in the plastic Control Block and then you need to replace the Control Block (are repair them with a metric Helicoil kit). Topically this setscrew is about flush with the outside of the control block when it is properly engaged with the poly tube.
Valley Kayak Skeg Tube Splice Kit
Product price and quantity: x ()
Items in cart:
Cart subtotal: USD
Related Items